The Ken Burns effect, named after the famed documentarian, has been one of the more handy tricks in FCPX but it has been handicapped by always being forced to “Ease In” and “Ease Out.” These “easing” makes each move start and end on a complete stop and gently “eases” in and out of motion. This effect can be good (read: almost never), but is not always desired.
Apple finally gave us, after two years, the ability to choose whether we wanted to ease in or out or both or none by adding the ability to do a “Linear Ken Burns.”
To apply a Linear Ken Burns first apply the Ken Burns effect.
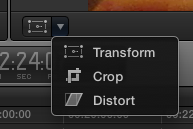
First select the desired Clip and click on the transform button.
 It is located in the bottom right hand corner of the viewer window. It looks like this picture.
Click on the small down arrow next to the icon and choose “Crop”
Now on your viewer screen will be a box surrounding the edge of the screen with a dotted line and three options at the bottom: Trim, Crop, and Ken Burns.
You guessed it- Click on Ken Burns.
This will add two boxes to your screen- the red one is the ending frame size; the green one is the starting frame size. FCPX will created an animated movement to those two frames with the speed based upon the duration of the clip. So, a short clip will have a relatively faster animation speed than a longer clip. Play around to find the right settings.
After you have set up the frames right-click on the screen and choose “Linear.”

If you want the traditional “Ease In and Out” you can always change it back by following the above steps and by choosing that option. If I have a series of photos that I am cross dissolving between, I like to have my first photo in the series ease in and the last in the series ease out. I think it helps make it feel more like the beginning and end, respectively.
So there you have it! That’s how you do a linear Ken Burns!
Hit me up with any questions!

